Monster Never Cry - Enjoy a Smooth 60 FPS and get the Best Gameplay Experience
In the shadowy realm of Monster Never Cry, players are summoned to an otherworldly adventure, where they stand as Demon Lords aiming to conquer and reign supreme. This game is not just an RPG; it’s a strategic battlefield where every decision can lead you to glory or downfall. With its compelling mix of monster collection, strategic battles, and city-building elements, it offers a rich, immersive experience that’s even more captivating when played on a platform that can match its depth and complexity.
When it comes to getting the best experience, playing Monster Never Cry on PC with BlueStacks is the ultimate game-changer for gamers looking to elevate their gameplay. BlueStacks doesn’t just bring the game to your bigger screen; it enhances every aspect of gameplay with its suite of powerful tools and features designed to give you the upper hand in battle, strategic planning, and managing your monstrous domain. From customizable controls that let you play your way to features that optimize your gaming session, to enhancing the performance of the game at all times, BlueStacks ensures your journey through the game is more fun, faster, and smoother at all times, being able to play it at 60 FPS and with the best possible gameplay experience.
In this article we will explore how BlueStacks can transform your gameplay, offering tips and tricks on maximizing its features to become the ultimate Demon Lord. Whether you’re battling heroic warriors, collecting shiny monsters, or rebuilding the Exiled City, BlueStacks is your ally on this epic quest.
Speed Up Rerolling with Multiple Instances
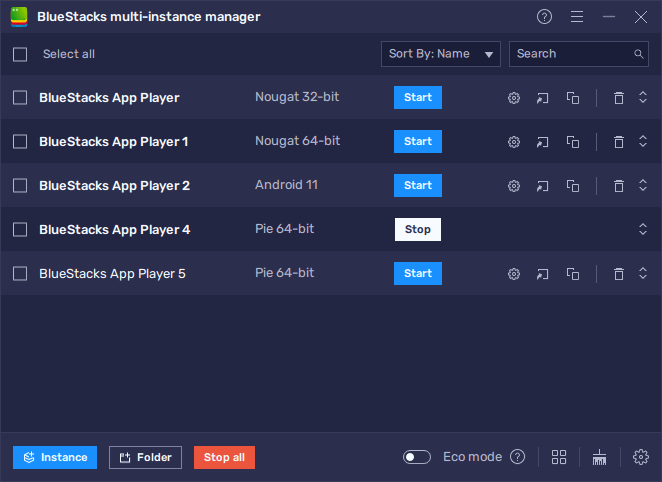
The Instance Manager on BlueStacks is a powerful tool that revolutionizes the way players start their journey in Monster Never Cry. By leveraging the ability to run multiple instances of the game simultaneously, gamers can significantly expedite the rerolling process, which is crucial for obtaining top-tier characters right out of the gate. This method allows for the opening of numerous Fel Eggs across different accounts, vastly increasing the odds of discovering those shiny, mighty monsters early on. Remember, while setting up multiple instances, it’s important to monitor your PC’s performance capabilities, as each instance adds to the RAM and CPU load.
Getting started is a breeze; with a simple shortcut, Ctrl + Shift + 8, the Instance Manager springs to life, presenting a user-friendly panel for managing your game instances. From here, you can effortlessly create, launch, or delete instances, adjusting settings to match your system’s specs. This ensures that each reroll session is as efficient as possible, putting you on the fast track to assembling the ultimate monster army.
Streamline Playing on Multiple Instances with the Instance Sync Feature
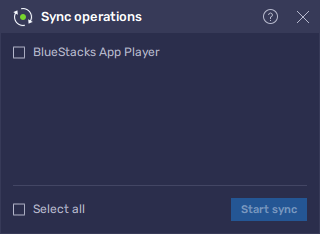
The Instance Sync feature on BlueStacks is nothing short of a game-changer for Monster Never Cry enthusiasts looking to manage multiple accounts with ease. This ingenious feature mirrors the actions from your main instance across all others, streamlining your game progress without the need to individually control each account. It’s an ideal solution for those utilizing the multiple instances strategy for rerolling or simply aiming to maximize their gameplay efficiency.
Activating Instance Sync is as straightforward as pressing Ctrl + Shift + 9, which brings up a panel for you to select which instances to synchronize. Once set up, actions performed in your main game window are replicated in the others, ensuring that all your accounts stay in perfect harmony. For best results, align your instances on the same game screen before syncing, guaranteeing a seamless transition and synchronization across your gaming sessions.
This tool is particularly useful for those who are seeking to reroll on multiple accounts at the same time, since you can progress on multiple different instances simply by playing on your main account, dramatically cutting down on the time required to complete each reroll cycle on all your accounts.
Navigate Menus with Ease Using Keyboard Shortcuts
Monster Never Cry’s depth lies in the intricate menu systems that players navigate to manage their armies, upgrade characters, and plan their strategies. BlueStacks’ Keymapping Tool is essential for streamlining these interactions, allowing players to assign specific keyboard shortcuts to frequent actions. This customization leads to a more intuitive and efficient gaming experience, minimizing downtime and keeping the focus on strategic decisions and combat.
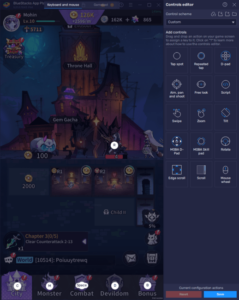
Accessing and customizing your key bindings is a snap with the Keymapping Tool, activated by Ctrl + Shift + A. This opens up a realm of possibilities, from tweaking existing controls to creating new shortcuts that suit your playstyle. The tool’s drag-and-drop functionality and easy binding process make it user-friendly, ensuring your setup is perfectly tailored to your needs. With these optimizations, navigating through Monster Never Cry’s menus becomes swift and effortless, enhancing your overall gaming experience on BlueStacks.
Mastering Monster Never Cry on BlueStacks with these essential tools not only enhances your gameplay but also ensures a smoother, more enjoyable journey through this dark, captivating world. Whether you’re speeding up your game start with Multiple Instances, syncing your progress across accounts, or navigating the game’s depth with ease through custom keybindings, BlueStacks amplifies your experience at every turn. Dive into Monster Never Cry with these features, and take your place among the ranks of the mightiest Demon Lords, where strategy, power, and efficiency reign supreme.
Leave us a comment in the section below if you are using BlueStacks to enhance your experience in Monster Never Cry on PC, as well as feel free to leave any lingering questions or doubts related to this topic.