Network Scanner
Network Scanner

Network Scanner

Tools

| First Row

Play on PC with BlueStacks or from our cloud

  • Overview
  • How to Download

Page Modified On: June 06, 2025

Run Network Scanner on PC or Mac

Let BlueStacks turn your PC, Mac, or laptop into the perfect home for Network Scanner, a fun Tools app from First Row.

About the App

Ever wondered who’s really connected to your WiFi or just want a clearer picture of everything happening on your network? Network Scanner by First Row is designed for that – a handy app in the Tools category that’s all about helping you take charge of your network space. Whether you’re curious about the devices at home or you’re working on something a bit more technical, this app gives you a smart, simple way to get real answers about what’s going on across your network.

App Features

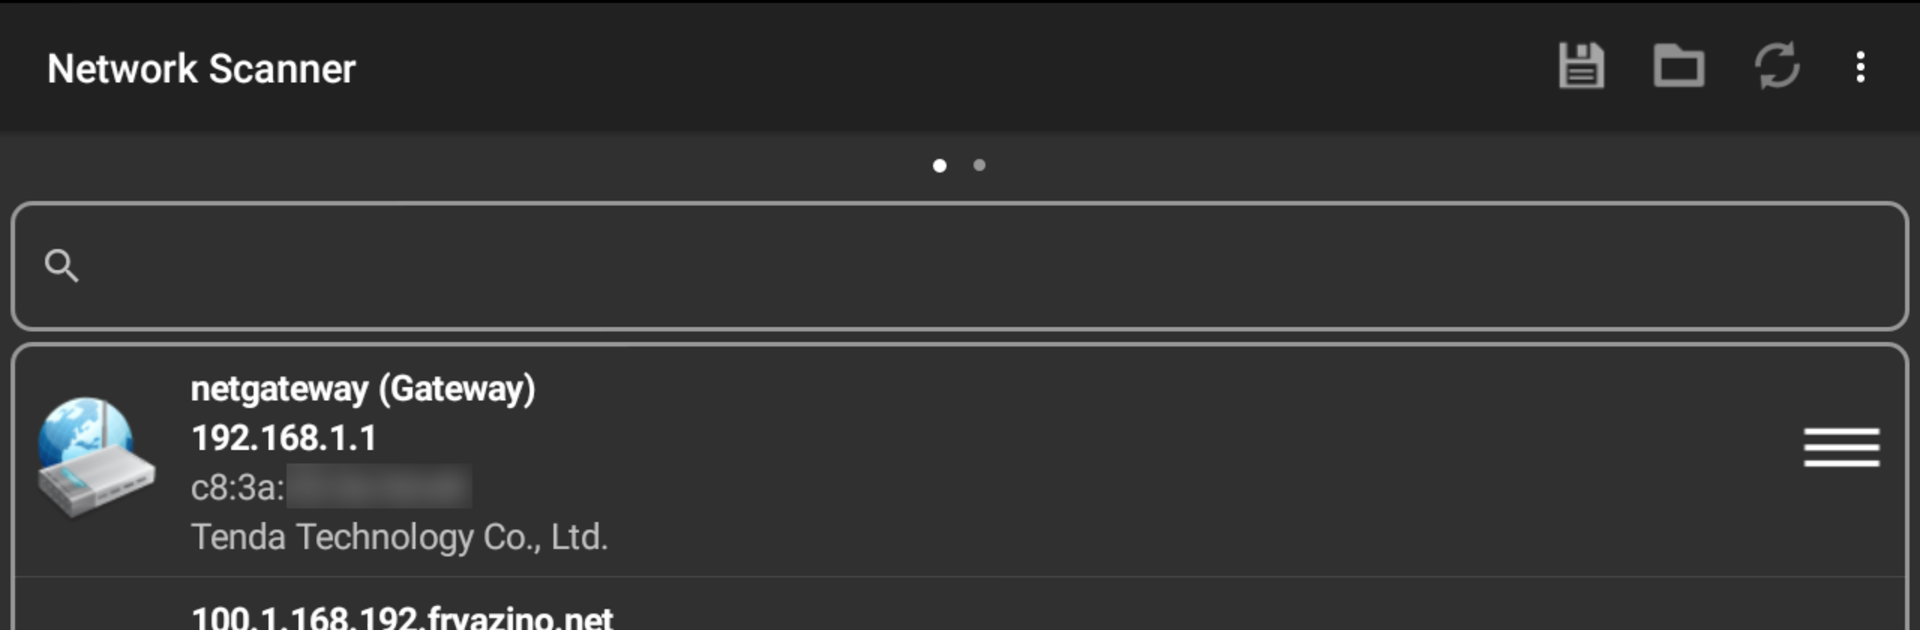
  • Fast Device Discovery
    Instantly spot every device in your home network or any IP range you choose. See who’s online and get details about each connected gadget, from phones to printers.

  • Deep Port Scanning
    Need to know which services are running where? Network Scanner can check open ports and help you pinpoint the servers or devices you want, all with a few taps.

  • Multiple Scan Methods
    Four scanning modes (ARP read, ICMP ping, UDP ping, and DNS requests) give you options for figuring out what’s connected and how responsive it is.

  • Custom DNS Selection
    Want to use your own DNS server when doing a scan? No problem—you can set it up to fit your private network needs.

  • Handy Network Utilities
    Troubleshooting just got easier: use built-in tools like Ping, Traceroute, Port Scanner, IP Calculator, Wake On Lan, and a detailed network information display.

Network Scanner works great on all your Android devices, and if you’re on BlueStacks, you’ll get an even bigger view of everything.

Eager to take your app experience to the next level? Start right away by downloading BlueStacks on your PC or Mac.

How to Download and Run Network Scanner on PC or Mac

  • Download and install BlueStacks on your PC or Mac

  • Complete Google sign-in to access the Play Store, or do it later

  • Look for Network Scanner in the search bar at the top right corner

  • Click to install Network Scanner from the search results

  • Complete Google sign-in (if you skipped step 2) to install Network Scanner

  • Click the Network Scanner icon on the home screen to start playing

video
Watch Video

Minimum System Requirements

With BlueStacks 5, you can get started on a PC that fulfills the following requirements.

  • Operating System

    Microsoft Windows 7 or above, macOS 11 (Big Sur) or above

  • Processor

    Intel, AMD or Apple Silicon Processor

  • RAM

    at least 4GB

  • HDD

    10GB Free Disk Space

Note:

* You must be an Administrator on your PC. Up to date graphics drivers from Microsoft or the chipset vendor.

Network Scanner - FAQs

  • How to Run Network Scanner on Windows PC & Mac?

    Run Network Scanner on your PC or Mac by following these simple steps.

    • Click on ‘Download Network Scanner on PC’ to download BlueStacks
    • Install it and log-in to Google Play Store
    • Launch and run the app.
  • Why is BlueStacks the fastest and safest platform to play games on PC?

    BlueStacks respects your privacy and is always safe and secure to use. It does not carry any malware, spyware, or any sort of additional software that could harm your PC.

    It is engineered to optimize speed and performance for a seamless gaming experience.

  • What are Network Scanner PC requirements?

    Minimum requirement to run Network Scanner on your PC

    • OS: Microsoft Windows 7 and above:
    • Processor: Intel or AMD Processor:
    • RAM: Your PC must have at least 2GB of RAM. (Note that having 2GB or more disk space is not a substitute for RAM):
    • HDD: 5GB Free Disk Space.
    • You must be an Administrator on your PC.