How to Optimize Your NFT Property Trading in Upland with the BlueStacks Instance Manager


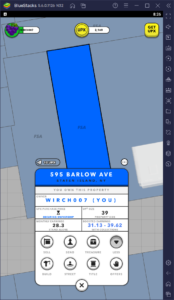
Upland is a blockchain game where you and other players from around the world can travel across digital versions of real cities and spend UPX, the game’s main currency, to mint vacant lots as NFTs and add them to your collections. These lots, in turn, will generate passive revenue every few hours, which helps to slowly recover the initial investment in time. And while there are ways to increase the revenue generated by these properties, such as by adding them to collections, the main way in which players will earn UPX in Upland is via trading assets in the marketplace, letting users sell their hard-earned NFTs for a markup over the initial minted price.
While Upland can start very slow for most players, as they will only have a small sum of UPX to play with (unless they spend real money to purchase more funds), it will quickly pick up the pace after reaching a net worth of 10,000 UPX, which is when users earn Uplander status as well as access to the in-game marketplace. In this sense, by trading assets, players can earn profits and purchase additional properties, scaling up their net worths bit by bit.
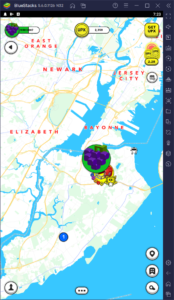
The main problem in Upland, however, is that, since the game has been around for a few years, finding vacant lots has become progressively more difficult. For new players that have just acquired their first lot, finding a second or third one to purchase is exceedingly complicated, not only because of the UPX cost but also because of the availability of vacant properties.
How to Acquire More Properties by Playing Upland on PC With BlueStacks
Luckily, this predicament can be somewhat diminished by playing on multiple accounts since you will be able to easily acquire at least one property on each and, after reaching Uplander status with each, trade these assets between all your accounts through the in-game market. And in this regard, BlueStacks can significantly streamline this process via the Instance Manager.
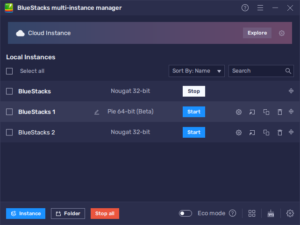
The Instance Manager is a BlueStacks feature through which you can create multiple instances of our Android emulator which, in turn, would let you play games on several accounts simultaneously, without the hassle of having to manage numerous devices or manually alternate between these accounts on your phone. For this reason alone, playing Upland on PC with BlueStacks is the method of choice, at least if you want to progress and add more properties to your collection in record time.
If you haven’t already, we suggest starting by reading our BlueStacks PC setup guide for Upland. Once on BlueStacks, you can press Ctrl + Shift + 8 to open the Instance Manager. On this new panel, you can view, modify, or even delete your current instances. To create new instances, simply click on the “+ Instance” button and follow the instructions that appear. Afterward, to launch your new instances, you just have to click on the “Start” button on the manager panel.
Once you have all your instances up and running, all that’s left is to link a unique Google account and install Upland on each, and then get to playing on all your instances simultaneously. In this manner, you can cover much more territory, purchase more NFTs, and even trade between your different accounts once you reach Uplander status in each.
Are you already playing Upland on PC and taking advantage of all the tools our Android app player has to offer? Feel free to leave your thoughts in the comments below!